Showing posts with label guitar refurbishing. Show all posts

Saturday, June 27, 2015

Always something

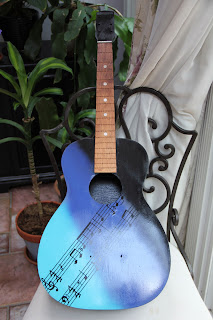
Ignoring my piano and any attempt at practicing or improving my playing, I succeeded (if that is the correct word) at finishing the refurbishing of my 1970’s Silvertone guitar into the one and only “Chitlins Con Carne” guitar.

Chinese pre-everything fret wires, top, with the old fret wires, bottom, and the new strings, right.
I did decide to coat the guitar with polyacrylic. Even at that, the music notes still pulled away from the edges in a couple of places. I just cut away the offending portions. In the 90-degree heat, 90-percent humidity, this was also no small task, but I turned on my powerful fan and just kept the airflow going. In a short time, we were ready to install fret wire.

Fret wires installed without breaking my neck...or the guitar's.
Here, I have to applaud Chinese industry and my savvy Amazon shopping ability. To get pre-radiused, pre-cut fitted fret wire individually packed by size in a handy plastic envelope, was nothing short of genius on both sides of the Pacific. I thought they would install very easily, but even the thin coating of polyacrylic prevented the fret wire insertion. I scraped them out again and manage to bang in the fret wires without breaking the neck, even though it was already loose.
The Chitlins Con Carne guitar, complete!
And so, I started stringing the guitar. The very first string I put on, which was the thick one, buzzed against the fret wires. I dealt with the problem by shimming the string holder. Still, when I tuned up the strings, it pulled the string holder over the shim and off the surface of the guitar. I have no good way to solve the problem.
Goddammit! Now what?
I showed my handiwork to Mrs. S and I showed her the problem. She just said. “It looks great and you’re not going to play it. Just leave it.” I intend to do what she suggests. Therefore, the guitar is finished.

Saturday, June 13, 2015

Pretty fancy for a Silvertone

Once I got the “Chitlins Con Carne” music applied, the only thing between me and a finished decorative guitar was time. I already had purchased strings and polished most of the parts that I took off the guitar. I bought a complete set of pre-radiused fret wires. I had rounded a couple of mother-of-pearl dots by hand. I even had my stain for the neck picked out. So, remembering the rule of “Google it first, then give it a try”, I was ready to install the mother-of pearl on the fret board. 

Or so I thought.

When I googled the installation of the mother-of-pearl, the video I watched showed a clever way to find the center line of each fret. Although it is quite obvious if you stop and think about it, not only does the width of each fret shrink as they march down the fret board, the neck itself tapers from wide to narrow from the body up. This means you can’t quite find the exact center just using an eyeball measurement and measuring across the neck. Fortunately the video showed a clever way to use a straightedge to apply lines to narrow down the degree of difficulty in finding the center of the target frets, and I soon had these all very neatly marked out on my guitar’s neck.

THAT is a straight line!
Next came opening the holes. I had some idea of using a punch and just pounding the holes open then chiseling them out with my Dremel tool, but I was a little confounded about how I’d smack a punch into the guitar neck without snapping it. I thought about foam pads and dumb luck, until the video came to the rescue again. The answer was: a Forstner drill bit. Unfortunately, not only was I fresh out of Forstner bits, I didn’t even know what one was. A little research, and I had my answer. Home Depot five miles from home had a set (even though I only needed one) for $20. Mrs. S needed some stuff for the yard, so the next day we made a hardware run and I picked up my bits and Mrs. S picked up her pieces.

Pretty straightforward (get it?).
With my centers clearly marked, opening the holes was a breeze, especially since I still had all my painter’s tape applied from when I painted the guitar. I had to work on the dots to get them closer to the right size, but once I got them close, they were easily installed. I stained the guitar neck before applying the dots.

Stain is on.
I didn’t have a big issue getting the dots in, but because they are hand-rounded and the holes were uneven depths, once I had the dots glued in place, they required some sanding down. Of course, I re-taped around the dots while sanding, but I still managed to scratch the neck in a few places. I decided to use some stain touch up for hardwood floor repairs, but this turned out to be a lot darker than my first stain. No problem. I rubbed down the whole neck with the touch up, and ended up with a nicer, warmer finish that accents the guitar without taking away from the motif. Sometimes things just work out. The dots and neck look absolutely great. (To be honest, the dots are not completely flat with the fret board, but this isn’t going to get much playing and given how good they look, Mrs. S encouraged me not to mess with them anymore, and so, I won’t.)

Compared to the whitewash sprayed dots, the mother-of-pearl truly adds some class.
This weekend I will be experimenting with acrylic and polyurethane coatings, fret installation, hardware installation, and stringing. I believe I can finish this weekend, even though everything I have ever believed about refurbishing this guitar, just like my square grand piano, has generally not come true. We shall see.


Saturday, June 6, 2015

A plan comes together

The working title of this entry was: Hard things made easy
Original plan given to Mrs. S to do a mock up illustration. She said, "I'm not sure what you mean." 
The guitar project has been languishing of late, due to not being able to determine how I could apply a musical note motif to the front without spending inordinate amounts of time, money, energy, or a combination thereof.  Mrs. S finally steered me to a sign company that does appliques and stickers and such, and I negotiated with them about what I wanted done. After several times back and forth with email, the owner of the shop informed me that I would have to do a clear vinyl sticker, because she just didn’t think it was possible to do all those fine musical note cutouts in the vinyl. I agreed and told them to go ahead and prep the sticker. A day later, they told me to bring in my “axe” for the installation. (I told them it is hardly an “axe”; more of a “bauble”.

The sketch I made for Mrs. S to show her what I meant. She said, "Why don't you just work from that?"
Of course, when I get to the print shop, neither of the people I’d been dealing with was there. This turned out to be a good thing, because the guy who was there looked at the guitar then asked what I was trying to accomplish. As we were talking about the project, he goes, “Why don’t you do a cut vinyl instead of a sticker.” I said, because your boss doesn’t think it’s possible. He says, sure it is. I say, if you can do it, then let’s do it. So he went back into the corner and printed out my two bars of “Chitlins Con Carne” in black cut vinyl. He let me play with it, and I got it to where I figured I wanted it, and he proceeded to apply it.

Music application completed. Ready for more stuff.
About then the owner comes in, and of course, she knows who I am and what we are doing. She’s watching the guy applying the cut vinyl and goes, “Yeah, it’s good you’re doing a sticker. That’d be impossible with cut vinyl.” I say, it is cut vinyl. She says, no it’s not. I say, sure it is, and the guy says, yep. He pulled off the backing paper and voila! Music in the first degree. The owner goes, Wow, I would never have been able to do that. I say, I lucked out then. The guy did a little Exacto knife cutting around the edges, and we were finished. I’m going to do my damnedest to finish the thing this weekend. A little more paint, install the mother of pearl and frets, string it up, then up on the wall. I think I can do it in two days, if things go smoothly

Sunday, April 19, 2015

Wrong way, right way, two days

To be honest, deciding to buy a guitar was not a good idea. Deciding to buy a guitar to become an art project was a horrible idea. Deciding that the art project would be okay if I just used a little spray paint was downright stupid.

Ready to paint. Note the piece of tape at the top of the neck covering the Silvertone logo.
Yet here I am.

My vision for the guitar from the very start was more or less clear. And already, even though it isn’t finished, I’m quite proud of the way the paint job turned out. As a matter of fact, my very first attempt at my image came out damn near perfect.

Almost.
Getting ready for that sunburst effect to turn blue. Note the tape covering the model number at the top center.
The problem was paint drips. Laying the guitar on the floor and painting over it worked, it just wasn’t clean. I decided it had to be redone, which meant I had to sand it down again and, I had to figure out a way to keep from having drips on it. In my sleep, I came up with the idea of hanging the guitar up to limit the paint drips. It would also allow me to paint both sides of the guitar, and the edges, and the neck all at once. That was the ticket. In this humidity (it’s rained every day for a week here in north Alabama), I don’t know how long the guitar will continue to be sticky, but it’s painted, hanging in the garage and looking good.
Second time around. The burst is bursting and, no drips.
Next thing is to add the music to the front. Then I have to stain the neck and decide if I’m going to insert mother of pearl or not. Then, I’ll probably have to coat it with something so you can actually handle it. Then I have to remount the hardware. Then restring it.


First time around. Nailed it. 
Jeez. I wish I’d never seen the thing. I sure hope I can love my attention sucking child when it is all over.

Sunday, April 12, 2015

Don’t Fret

After a two day trip to Mexico Thursday and Friday to attend a sixty seven minute meeting, which was made much more of a bad idea by getting in a cab with a driver who not only spoke zero English, but also knew next to nothing about the roads of the city where the meeting was being held (Celaya), I was ready to relax this weekend. And what better way to relax than by restoring a musical instrument?
Looking better (?) already.
The instrument was already apart, so today I just made up my mind to work on the finish: I sanded the hell out of the thing. I’m keeping the “Silvertone” logo and the model number on the top of the neck, but everything else is going to be painted over. I patched holes, repaired a split, and sanded, sanded, sanded. Then I went to work on the fret board.

Sanded sunburst. This was definitely done as a "real" guitar.
In the DIY industry, they have a mantra of “measure twice, cut once”. Well, I declare that the mantra of the musical instrument restorer is “Google it first, then give it a try”. My fatal mistake here was trying to sand the fret board with the fret wires still in place. I did an adequate job of it with my Dremel, carefully working between the wires and taking the paint and scuff marks off, but it didn't look right. I did that because I couldn't figure out how to remove the fret wires. After botching it, though, I realized the only way to fix my mistake would be to sand the neck sans wires.

Fret free sanding sans frets ahead.
And of course, Google has videos and wikihows, and fifty different shades of websites for “how to remove fret wires”, and when I went back to it, the fret wires came right out. I could have saved myself about a half hour and made a much easier job of things if I had just Googled first. Naturally, I bent the hell out of a few of the wires when I took them out, too, plus I don’t like the gold color for the motif I have in mind. I've already ordered a set of pre-radiused wires from China. They should be here in 20 days.That will give me plenty of time to sand some more, restore the wood, and paint my motif, which will be based on some guitarist’s song. I’m thinking of calling my guitar “Kenny” and putting “Chitlins Con Carne” (note the hint of Mexico) as the music that will adorn the paint job. We’ll see.

Anyway, the frets are gone, I’m none the worse for wear and the guitar restoration continues. No need to fret, at all.


Saturday, March 28, 2015

Now what?

This past week, the Mrs. S and I participated in an estate auction. There was a nice authentic German doll that she wanted, and there was an Ibanez mandolin in the mix as well. The lot next to the mandolin was an unloved-looking Sears Silvertone acoustic guitar. When I went and looked at everything, the doll looked okay, the guitar looked kind of junk, and the mandolin looked great. We decided to see where the values went before we bid.

That doesn't look that bad for $46, does it?
Without telling you the story of the decidedly unexciting auction, we won the mandolin, the doll, and the guitar, all for what seemed good prices. The doll is porcelain and mohair but has a crack on its face. Still, it is cute and the cotton dress is in good shape. It is secure on a metal stand. Not bad for $6. Likewise the mandolin was bought for nearly $400 new, came in a case, and was virtually new, as the previous owner didn't know how to play it. (Neither do I, but so what?) The Silvertone guitar was beat, so I decided to take it apart to clean it up.

The color is gone, and, yuck!
Well, the more I looked at it, the more I realized, this guitar is just not worth saving. Even after washing with warm water and Dawn and scrubbing everything with a toothbrush (I know), the color is all faded, the wood is cracked and the paint job is a mess. It could be cleaned up and made spiffy again, but after the square grand piano turned into a bar project, I’m thinking I’m going to jump right to the artistic project and make the guitar playable, but make it something special, not an old Silvertone.

Parts are all there, so I can make it playable again.
I've already started looking for ideas. Suffice to say, it involves a lot of spray paint, glitter, and jazz imagery. I even have some mother of pearl from the piano that I can put into the fret board.

Even after a scrub down with dish liquid and warm water (it's my guitar, so too bad if you don't like my cleaning methods), it doesn't look all that ... jazzy.


Yeah. I've got myself into something. Stay tuned. (Heh-heh. Stay “tuned”. I think I've got my new catch phrase.)