Saturday, June 27, 2015

Always something

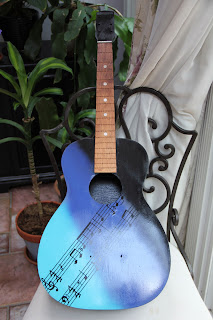
Ignoring my piano and any attempt at practicing or improving my playing, I succeeded (if that is the correct word) at finishing the refurbishing of my 1970’s Silvertone guitar into the one and only “Chitlins Con Carne” guitar.

Chinese pre-everything fret wires, top, with the old fret wires, bottom, and the new strings, right.
I did decide to coat the guitar with polyacrylic. Even at that, the music notes still pulled away from the edges in a couple of places. I just cut away the offending portions. In the 90-degree heat, 90-percent humidity, this was also no small task, but I turned on my powerful fan and just kept the airflow going. In a short time, we were ready to install fret wire.

Fret wires installed without breaking my neck...or the guitar's.
Here, I have to applaud Chinese industry and my savvy Amazon shopping ability. To get pre-radiused, pre-cut fitted fret wire individually packed by size in a handy plastic envelope, was nothing short of genius on both sides of the Pacific. I thought they would install very easily, but even the thin coating of polyacrylic prevented the fret wire insertion. I scraped them out again and manage to bang in the fret wires without breaking the neck, even though it was already loose.
The Chitlins Con Carne guitar, complete!
And so, I started stringing the guitar. The very first string I put on, which was the thick one, buzzed against the fret wires. I dealt with the problem by shimming the string holder. Still, when I tuned up the strings, it pulled the string holder over the shim and off the surface of the guitar. I have no good way to solve the problem.
Goddammit! Now what?
I showed my handiwork to Mrs. S and I showed her the problem. She just said. “It looks great and you’re not going to play it. Just leave it.” I intend to do what she suggests. Therefore, the guitar is finished.

Saturday, June 13, 2015

Pretty fancy for a Silvertone

Once I got the “Chitlins Con Carne” music applied, the only thing between me and a finished decorative guitar was time. I already had purchased strings and polished most of the parts that I took off the guitar. I bought a complete set of pre-radiused fret wires. I had rounded a couple of mother-of-pearl dots by hand. I even had my stain for the neck picked out. So, remembering the rule of “Google it first, then give it a try”, I was ready to install the mother-of pearl on the fret board. 

Or so I thought.

When I googled the installation of the mother-of-pearl, the video I watched showed a clever way to find the center line of each fret. Although it is quite obvious if you stop and think about it, not only does the width of each fret shrink as they march down the fret board, the neck itself tapers from wide to narrow from the body up. This means you can’t quite find the exact center just using an eyeball measurement and measuring across the neck. Fortunately the video showed a clever way to use a straightedge to apply lines to narrow down the degree of difficulty in finding the center of the target frets, and I soon had these all very neatly marked out on my guitar’s neck.

THAT is a straight line!
Next came opening the holes. I had some idea of using a punch and just pounding the holes open then chiseling them out with my Dremel tool, but I was a little confounded about how I’d smack a punch into the guitar neck without snapping it. I thought about foam pads and dumb luck, until the video came to the rescue again. The answer was: a Forstner drill bit. Unfortunately, not only was I fresh out of Forstner bits, I didn’t even know what one was. A little research, and I had my answer. Home Depot five miles from home had a set (even though I only needed one) for $20. Mrs. S needed some stuff for the yard, so the next day we made a hardware run and I picked up my bits and Mrs. S picked up her pieces.

Pretty straightforward (get it?).
With my centers clearly marked, opening the holes was a breeze, especially since I still had all my painter’s tape applied from when I painted the guitar. I had to work on the dots to get them closer to the right size, but once I got them close, they were easily installed. I stained the guitar neck before applying the dots.

Stain is on.
I didn’t have a big issue getting the dots in, but because they are hand-rounded and the holes were uneven depths, once I had the dots glued in place, they required some sanding down. Of course, I re-taped around the dots while sanding, but I still managed to scratch the neck in a few places. I decided to use some stain touch up for hardwood floor repairs, but this turned out to be a lot darker than my first stain. No problem. I rubbed down the whole neck with the touch up, and ended up with a nicer, warmer finish that accents the guitar without taking away from the motif. Sometimes things just work out. The dots and neck look absolutely great. (To be honest, the dots are not completely flat with the fret board, but this isn’t going to get much playing and given how good they look, Mrs. S encouraged me not to mess with them anymore, and so, I won’t.)

Compared to the whitewash sprayed dots, the mother-of-pearl truly adds some class.
This weekend I will be experimenting with acrylic and polyurethane coatings, fret installation, hardware installation, and stringing. I believe I can finish this weekend, even though everything I have ever believed about refurbishing this guitar, just like my square grand piano, has generally not come true. We shall see.


Saturday, June 6, 2015

A plan comes together

The working title of this entry was: Hard things made easy
Original plan given to Mrs. S to do a mock up illustration. She said, "I'm not sure what you mean." 
The guitar project has been languishing of late, due to not being able to determine how I could apply a musical note motif to the front without spending inordinate amounts of time, money, energy, or a combination thereof.  Mrs. S finally steered me to a sign company that does appliques and stickers and such, and I negotiated with them about what I wanted done. After several times back and forth with email, the owner of the shop informed me that I would have to do a clear vinyl sticker, because she just didn’t think it was possible to do all those fine musical note cutouts in the vinyl. I agreed and told them to go ahead and prep the sticker. A day later, they told me to bring in my “axe” for the installation. (I told them it is hardly an “axe”; more of a “bauble”.

The sketch I made for Mrs. S to show her what I meant. She said, "Why don't you just work from that?"
Of course, when I get to the print shop, neither of the people I’d been dealing with was there. This turned out to be a good thing, because the guy who was there looked at the guitar then asked what I was trying to accomplish. As we were talking about the project, he goes, “Why don’t you do a cut vinyl instead of a sticker.” I said, because your boss doesn’t think it’s possible. He says, sure it is. I say, if you can do it, then let’s do it. So he went back into the corner and printed out my two bars of “Chitlins Con Carne” in black cut vinyl. He let me play with it, and I got it to where I figured I wanted it, and he proceeded to apply it.

Music application completed. Ready for more stuff.
About then the owner comes in, and of course, she knows who I am and what we are doing. She’s watching the guy applying the cut vinyl and goes, “Yeah, it’s good you’re doing a sticker. That’d be impossible with cut vinyl.” I say, it is cut vinyl. She says, no it’s not. I say, sure it is, and the guy says, yep. He pulled off the backing paper and voila! Music in the first degree. The owner goes, Wow, I would never have been able to do that. I say, I lucked out then. The guy did a little Exacto knife cutting around the edges, and we were finished. I’m going to do my damnedest to finish the thing this weekend. A little more paint, install the mother of pearl and frets, string it up, then up on the wall. I think I can do it in two days, if things go smoothly