Showing posts with label piano renovation. Show all posts

Thursday, February 7, 2013

Why I Still Don’t Own an Acoustic Piano, Part Three

Or, Wading Through the Piano Ad Jargon, Part One

Piano sellers, God bless them, are a unique lot. There are a handful of realists out there, but for some reason, 95% percent of the people trying to sell a piano on e-bay or Craigslist see a gold mine and not a money pit. They aren't going to admit that there are a plethora of nicer, and correctly priced, pianos out there because for whatever reason, they think their piano is better or “special”. For this reason, it’s safe to say their viewpoint is not going to improve and they will continue to embellish the descriptions of their marginal (or worse) pianos. So, for those who are new to the piano buying game, I thought I would put my three years of experience and acquired knowledge to good use and compose this “Piano Buyer’s Guide to Piano Seller’s Jargon”, just to help out. It’s not all inclusive, but you should get the idea by reading through the short list below:

Seller says = Actual meaning

Brand new = a couple years old

Close to brand new = it’s pretty new, but something on it's broke

Like new = it was new, once, a couple years, okay decades, ago

Vintage = really old, which is why it doesn't work but I’m still trying to sell it

Antique = my grandma got it from her grandma and it’s been in our family ever since and we didn't know what to do with it aside from putting framed pictures and doilies on top of it

Requires TLC = broken

What the seller sees
Just needs tuning = just needs new pins, thirty or forty strings replaced, a dehumidifier or humidifier, and two tunings by a professional, at least two weeks apart

Not all the keys work but can easily be fixed = will only cost a couple thousand to get in working order

Needs minor repair = we couldn't get it to work

A few nicks and scratches = one of the legs still has some paint on it

Great for a beginner = if you've never touched a piano before, you might even believe for a couple of minutes that this is a musical instrument

Nobody in our family plays = See “antique”

Our daughter only played it a few hours a week when she was little = the chocolate milk stain is quite faded and most of the snot has flaked off by now

What the buyer sees
Can’t bear to see this piano not being used = we have enough firewood

Sounds as good as the day we brought it home = I’m still as tone deaf as a rock under water

Seriously, it took me a long time to figure out a lot of this jargon, and that’s why I still don’t own an acoustic piano. (End part three)

Tomorrow: Part Four of Why I Still Don’t Own an Acoustic Piano, which will also be part two of Wading Through the Piano Ad Jargon

Sunday, October 14, 2012

The Completion

You know, truth be told, this piano fought for its life to the very end. It just didn't want to go back to being a playable piano, but after that, it wanted even less to be a bar. I was not satisfied with an unplayable piano taking up the kind of space that this one does. It’s just ridiculous. So I made up my mind to make it into something mildly pretty and completely useful. Since I’m a bit of a boozaholic, a bar seemed a good fit.

But truly, the piano fought me to the end.

Once I cleaned up the finish and vacuumed the felt, I moved the beast over to the stairs. Mrs. S helped again with moving the support boxes to change the height to go up the stairs, and then sliding the bar across the floor on an extra carpet we keep for playing poker in the garage. Now that it is about 350 pounds lighter than when I started, this process was not nearly as bad as it sounds. Once I had it on sawhorses in the dining room, the real fight began. 

Right away, the first leg (right rear) wouldn't go on because the felt was in the way. Since the felt on the back will not be seen by anybody, I was okay with just removing it. I had to smack the leg to get it in place, but that worked. Right front leg was mounted without any problem. Left back leg was a different story. Not only was the felt in the way, so was the sound board at the bottom of the bottle well.

Son of a -!

There were different sorts of approaches I could take, but I wanted to minimize the amount of work I had to do. I unscrewed just enough screws to lower the sound board to let the edges of the leg slip between the bar and leg. That was relatively painless and I quickly screwed the bottle well board back in place without checking clearance on the front left leg.

You’re probably expecting another “Son of a -!” here, but actually, the leg just grazed the sound board and I was able to get it on. About then Mrs. S wandered in and liked the look of the thing but suggested I reattach the pedal lyre. Even though I knew I removed the dowels that held it, I (for some screwball reason) thought, sure, why not? I crawled under the bar and remembered why not.

Legs on, sitting pretty on the floor. 
The bottle well is where the pedals used to go.

We went with just leaving the pedals positioned on the floor, more or less in place where they go. Good enough.

The keyboard, because it was originally designed to be pushed in and taken out went right back in, no problem. Hardly worth mentioning, but there you go.

Lights off, lid on. (This picture is not sequential with the others.)
Now for the lighting. Bad planning here again. I drilled holes for the light cords in the back of the piano toward the edges. Turns out that’s where the legs ended up. Had I not had some foresight (as I will relate in a moment), I would have had to drill the holes through the legs. That might not have been bad, however, the LED panels I bought actually came with a switch. Obviously, the switch needed to be at the front, where it could be reached, so the holes in the back wouldn't have been of much use anyway. Back when I was drilling holes for electrical cords, however, I didn't actually own the lights at the time, so I didn’t know what the cord configuration was going to be. Figuring I had nothing to lose, I drilled two more cord holes in the front of the bar.

Lighting installed. Notice the glare on the right where the piece of the piano is missing.

Good thinking, Eric.
  
I installed the switch, ran the cords, attached the lights and lit everything up. Worked like a charm except the cord length dictated one of the lights end up where a big chunk of the back of the piano had gone missing during the pin block removal process. I covered that up with the support rod from the pedal lyre (which doesn't have anywhere to attach to any more anyway).

Rod installed and glare gone. Looking good!
 I plopped the lid and support arms back in, and the bar, after only two and a half years, was complete!

The bar is closed, for now...
Time for a drink (next entry)!

Thursday, September 27, 2012

Al…..most………there…….


Last weekend, I decided a few things: I’m sick of my garage being filled with tools and a broken down piano. I’m sick of sacrificing my piano playing time for DIY labor on a piece of furniture. I’m sick of not looking for pianos because the one I have is not doing anything practical with the space it occupies. I just wanted the thing to be done with! So Saturday and Sunday, both, I put in whole mornings and partial afternoons and I have, at long last, wrenched the bar out of the piano, and have reached the point where, although I’m not finished, I’m down to just polishing and primping. The manly man work is done.
Not bad, if you don't look too close...
 The hardest part was getting the cheap felt to cover the surfaces, especially the back. Let’s face it: $3 a yard doesn’t buy you much quality when it comes to felt. (The one and half yards I bought for the piano when it was still going to be a piano cost over $100. The six yards I bought for the bar: $14.) Once I had the back covered, doing the inside was much easier. I used staple gun staples to hold everything down, and used decorative thumbtacks everywhere else. The result was reasonably neat and effective.
Nice neat felt, surrounded by trim, shelf brackets, and decorative tacks. (Note the height adjuster sound board nibs, already installed on the serial number shelf.)
 Installing the bottom in the bottle well was tricky, but certainly not hard. The hardest part was turning the piano over to drill the holes, but now that it is so light, even that wasn’t particularly difficult. The effect using the old soundboard is exactly what I was hoping to achieve.
Deep enough for those tall bottles of booze, except where the hitch pin block is, upper left. (That's according to plan, folks, believe it or not.)
 The shelves were another matter. There’s no good way to get tools into the crevices to drill holes and turn screws. I ended up installing bits of pin block sideways into the piano as shelf supports. I recycled the damper board as a shot glass shelf, and when the OEM serial number shelf didn’t turn out as expected, I installed the old music rack over the top of it, leveled with soundboard spacers and pin block (again). Both these shelves turned out quite nice.
Damper board as shot glass shelf. Note the trim in the corners already installed
With the keyboard, I got lucky. The rod I used to insert into the space wouldn’t go in with everything screwed down, so I took everything apart and screwed everything back together with the rod sitting about where I wanted. As I was tightening the screws, something suddenly snapped and settled, and boom! The rod was in place, looking nice and functioning exactly as I hoped it would. That almost never happened during the two years I was working on this piano/bar.
Music stand as shelf. Who wants a "Between the Sheets (of Music)"?
 All that’s left now is to polish it, screw the keyboard in, install the lights, and put the top back on. It’s about two hours of work at most. Then, just fill it up with booze and watch my guests’ eyes when I open it up the first time.
The just-about-finished product 
I’m so glad this is almost over.

Wednesday, August 8, 2012

Keys to the kingdom

Sometimes, you just can't hack away. Especially if you've broken a bone in your hand, you want...need... must.... take a break. (Oooooooooh, that hurt!)

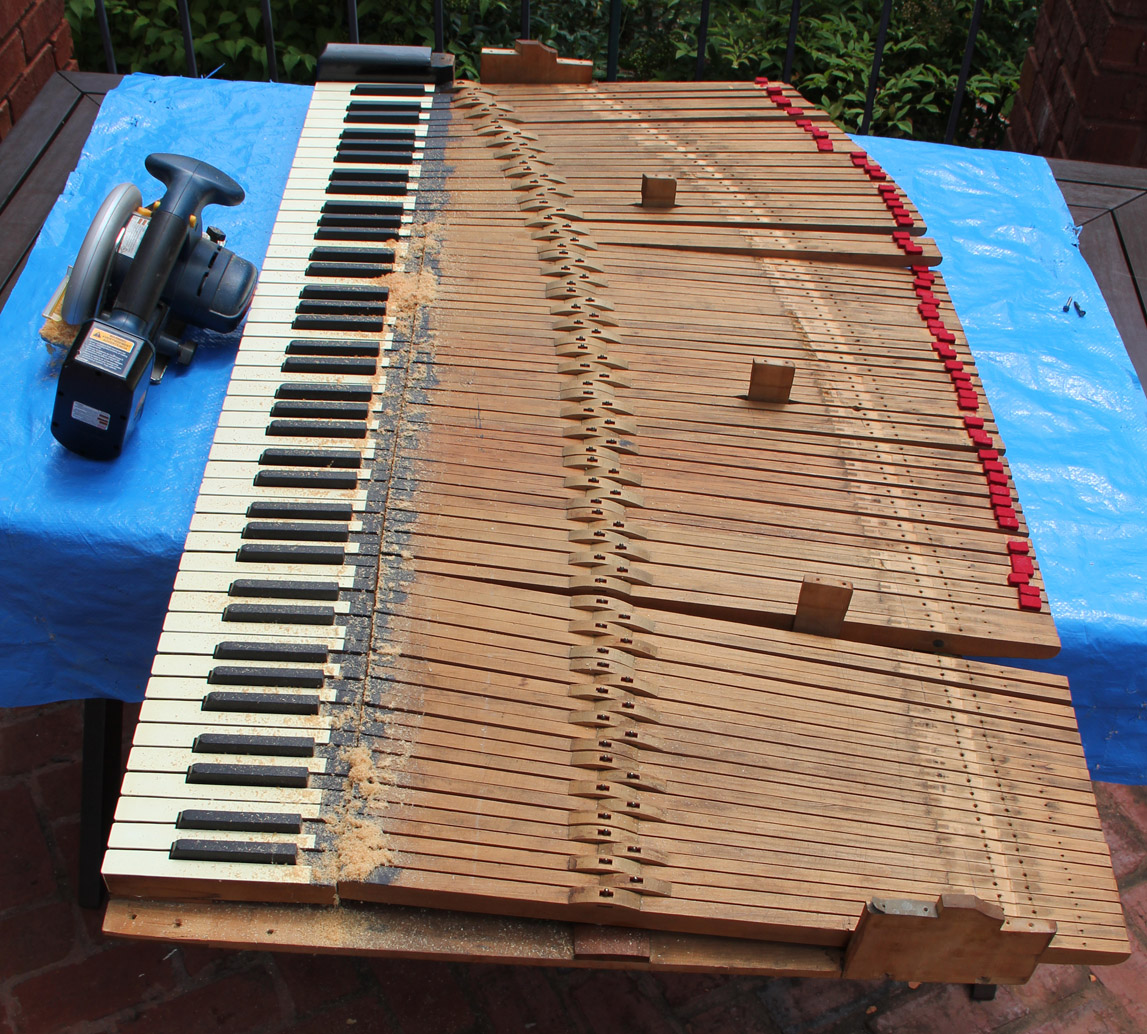
When I just couldn’t stand to do more grunt work of tearing up the piano, I did some “artistic” work preparing the keyboard. The first step was to glue down all the keys to stabilize them for cutting. I used contact cement for that, and managed to start and finish the gluing process just prior to a rainstorm that would have probably ruined the keyboard if I had started five minutes later. The next day, even though the keys appeared to be securely glued down (which was a tedious process to get the spacing right as well), I put some more glue on them to make them a little more secure. The following weekend, I moved back outside and took my circular saw to the keys. 
The first cut is the most unnerving, but once it's done, surprisingly, reassuring.
Even with the lumpy pivots in the cutting track, it made quite short work of the key arms.

From here, there's no turning back.
I then removed the rest of the metal from the frame and cut it down to size, right behind the keys. 

It was a surprisingly quick process and I ended up with a pretty good looking, short, compact, antique keyboard. 
You can't tell me that doesn't look cool. Admit it: You wish you had one to put on a bookshelf at home, just for a conversation piece.
I still have to do some finishing on the cut edges and I’m going to pour some acrylic or something in the cracks to make them even hardier, but I’m quite happy with the result and I think it definitely gives the bar a unique look.

Tomorrow: The feeling of emptiness...

Wednesday, July 4, 2012

Toe-to-toe

The piano and I went at it with gusto over the weekend. Given the number of bruises, contusions, strains, cuts, sprains and aggravation I suffered, I would say the piano was the winner of our first few battles, however, when all was said and done, I didn’t have any pieces of me missing. My superior mental prowess is proving the difference.
The piano about to be turned sideways on the rug for moving. Notice the plastic totes on the right, used for height adjustment and to keep toes from being broken.
The first and arguably hardest step was moving the piano to the garage. Mrs. S was not able to lift one end of the piano, and I was not one to risk injuring her or myself to do it. I came up with a clever system of plastic support totes, where I could lift one end of the piano and Mrs. S could move totes in and out to change the height of the piano. We were able to lower it to the floor and onto a carpet to slide to the garage door. From there we duplicated the tote system in reverse, and put the piano back up on the sawhorses. Then I laid into the sucker.

First chunk removed (left)
After breaking one of the teeth off of my oscillating tool, and then breaking a handle off of a screwdriver, I began to conclude that I was not going to beat the animal glue with brute force. Seriously, think about a horse’s hoof. Now imagine you liquefy the hoof, squish it between two boards and let it harden. Now imagine trying to pull those boards apart. Right, not happening. But if you were to soften that hoof again… And what softens animal glue? Water.
Broken screwdriver. F-word. Mother f-word, f-word, s-word. Fuck.
So I used my oscillating tool to put strategic grooves in the wood and seams, then squirted them full of water. Then I waited a minute or two before taking a screwdriver or pry bar and pushing or pulling. It wasn’t long before I had managed to chip out a bunch of splinters from the solid block on the right, and eventually, I broke through the thickest part of the pin block on the left. I was pretty much able to lever out the heavy anchor block. (Some bits of it are still intact.) Then I took a hammer and pry bar and went at the crack and seams of the pin block. I had about a third of it removed after about an hour.

Chunks of piano.
The heat is making the work slow going, but from today, I have five days off. I spent today removing the slatted support block on the right. My goal is to get the piano finish-ready by Sunday. If it cools down enough, I may even finish the wood cabinet. I have an idea for installing a bottle rack and mirrors and a felt surface. If I can just get the rest of the wood out. I also have a brilliant idea for finishing the keyboard, which I’ve started working on in the evenings while watching TV. It won’t be long now…

More piano chunks

Monday, June 25, 2012

Feeling the joy of breaking something

Day two of the dismantling of my piano went smoothly and as planned, succeeding in getting down to the harp and removing it. I can’t tell you how much easier everything is when you know you are not going to be putting the piano back together again. You just tear, unscrew, pry, twist, pull, whatever you want to do on whatever part you want to, and you keep doing it until it comes off, pops out, breaks away, or whatever. I even removed the pedals and most of the accoutrements underneath the piano that supported and moved with the pedals, finally getting stopped by some smallish screws that are going to require a special screw driver (which I borrowed from work today) to remove.

Tuning pins
The sound board, too, has come loose and it is being held by some screws that require a short screw driver to get to. I borrowed that from work today, too.  

Strings
The harp is for sale on craigslist. I’ll probably put the pedal lyre up for sale as well. I’m keeping all the metal together to hopefully gather up enough to make a run to a scrap yard (if I don’t sell the harp). I’m going to wring every penny out of the thing that I can.

Harp
 And I really can’t wait to see how light the piano is when all the insides have been pulled out. Maybe Mrs. S and I will be able to move it ourselves, though I’m planning to get some large bodies from work to assist me to get it out to the garage so I can work on it over the long holiday weekend coming up. There’s going to be a lot more cutting, sawing, hacking, shredding, sanding, and finishing done to it. Yep, it feels really, really good to be taking this piano apart, knowing it will never be a piano ever again. At least, not an acoustic piano, as I still plan to try and insert my Yamaha in it first. I’m keeping the old keys for now. Those will be the centerpiece of the bar, if that’s the route I end up taking. I really didn’t think destruction of this piano could make me feel this good. I had no idea.

Sunday, June 24, 2012

So begins the ending

I have begun to take my piano apart for the second (and last) time. I can’t tell you how good I feel. Having that big chunky case stare at me every time I played my little Yamaha, it’s just purely cathartic to rip the insides of the case out again. By dinner time yesterday, I was giddy, and I don’t think it was from drinking two afternoon cocktails.
Lid, arms, trim, and dampers are off!
 This time around I’m actually measuring and weighing all the individual parts. (Lid: 53 pounds, damper push pins: 6 ounces, etc.) I will make myself an expert on putting together square grand pianos without ever actually successfully re-assembling one. Like this:

Step 157: Regulate the keys as you would for a normal piano.

Call me if you need damper rods for an 1880's piano.
Ha-ha-ha-ha-ha-ha-ha-ha-HAH, ho-ho-ho-ho-ho-ho-ho-ho. Yeah, good luck. That’s a good one! He-he-heee.

Oh, this is genuine fun.

Tuesday, September 6, 2011

Days 92 and 93 – Sunday, September 4 and Monday, September 5 – Good progress

Goals: Work on it

Music: Doing some tuning, so none.

I did a second coat of acrylic on the mother-of-pearl inlay because the first coat did not come out very even. The second coat didn’t either, because it is basically impossible to get the acrylic even across the board, because it is so long and narrow and because it drips over the edge. I got it pretty close to what it needs to be, and I’m leaving it at that.

Then I got to work on the strings. I had to re-shim about 25 pins, but that’s all I did. I did not mess with bigger pins and whatnot. If a pin was loose, I shimmed it, re-strung the existing string and cleaned it up as best I could, then tuned it. Two days of that, and the strings are completely tunable, and, as of this moment, in tune. That’s as far as I’m going with that.

Next is to get the keys working. I’m very close to settling for a majority of the keys working, as opposed to a fully working piano, so if some keys are stubborn and do not work, there is some chance I may talk myself out of working on them and simply leave them dead in their tracks. I really just want to get the piano looking nice and trade it to somebody for a sweet black lacquered baby grand. There is still an outside chance I will end up with a bar or a desk, if I meet any severe adversity before the end of the project.

Inching closer to completion, and I must say, it feels good – again.


Sunday, September 4, 2011

Day 91 – Saturday, Sept. 3 – Because I just can’t put it off any longer


Goals: Get the artistic stuff on the accent piece finished

Music: Charlie Parker’s “Complete Jazz at Massey Hall” and Complete Verve Master Takes, Discs 1 and 2.

There’s just no getting around it. Whether Mrs. S. cares if we ever get the dining room back or not, I for one am definitely sick of having this piano project hanging over me. I decided not to make excuses and to just get back to work.

Since I didn’t want to tangle with the strings, which is off-putting in general and particularly hard work in specific, I decided to exhilarate my artistic side and work on the mother-of-pearl inlay on the fascia board. I touched up the gold paint, having already done the black paint before the project went into hibernation, and I drew in some leaves and flowers to make it look nice. I poured a layer of clear acrylic over it, and that made a bit of a mess. I shook most of it off and left it to dry.

This morning I checked the board and the acrylic didn’t turn out bad, but it isn’t great either (pretty much like everything on the piano). So, I will try to put a few more touches on the board and then one more coat of acrylic and then we’ll see about the strings.

It’s supposed to rain today, which means I won’t be able to smoke the ribs I prepped, which means I won’t have to spend a ton of time cooking, running back and forth to the grill, etc. So I’ll be cooking in the oven and have plenty of time to work on the piano. Hopefully, I’ll make some genuine progress today.

Sunday, July 17, 2011

Top ten reasons why finishing my piano is taking so long

10) It won't cooperate. Let's face it: even inanimate objects can be a bitch sometimes. This thing goes out of tune if I look at it cross-eyed. It's discouraging.
9) Runner's knee. Had it for four weeks. Doctor says I'm not a five-foot-five, 110-pound Ethiopian and that I need to run in shoes instead of barefoot or flats. Seriously, though, the single most painful activity with runner's knee is standing - the required posture for tuning a square grand.
8) I can't see the end so I'm reluctant to work toward it. I don't know what else to say about that.

I guess there are only three reasons.

Sunday, July 3, 2011

Day 90 –Sunday, June 26 – Rain outside, gloom inside

Goals: Work on it

Music: Doing some tuning, so none.

A bad case of runners knee and cloudy skies and the threat (and actual falling) of rain more or less forced me to work on the piano. A while back when I inserted the keys, I realized that I had some double strings that I had tuned as if they were singles, meaning that my piano was severely under-tuned in the lower register. I set about correcting that. So, to be sure I had everything correct, I started at middle A, which, diligent readers will remember, I tuned to G# to lower the stress on the piano. Unfortunately, I seemed to have miscounted, probably because of the double strings I counted as singles, and what should have been G# was actually at F. Cripes!

So, starting at middle A, I moved everything up so that all the keys would be a half tone flat. That meant tightening everything. That meant finding some pins that couldn’t hold tune because of the increased stress. I wanted to get at least half the keyboard done, but standing up in that awkward posture made my knee start hurting too much, so I wasn’t quite able to do half the keyboard. And at that, I had four strings that were untunable. I might try for a whole tone down to see if that makes life any easier for me. Anyway, I could only work for an hour and half, but that was enough. The piano is getting closer and closer to being a decorative piece and not a musical instrument. I swear if things don’t start going right with it pretty soon, I’m turning the sucker into a bar.

Wednesday, June 15, 2011

Studying Up

It’s hard – no, make that impossible – to work on much of anything whenever you get called in to work on the weekend. This happened to me two Sundays ago and last Saturday, so progress on my piano has more or less ground to a halt. Because of my ruined Saturday, Sunday was overly hectic, but I did find time to leaf through and read my piano repair manual and try to figure out what to do with the wippens that are killing about fifteen of the keys in my piano (if in fact it is the wippens – there may be some fit issues with the hammers as well). In short, at this critical and hyper-detailed juncture, I’m not finding much help for my square grand in a manual that focuses almost exclusively on grands and uprights, not to mention the frequent detailed passages about Steinways. I was able to glean a few ideas from the book, but I’m still not really sure what is going to be the best way to repair the keys that keep dying. I expect it will require some experimenting.

So, this coming weekend, I think I’m going to move to some cosmetic work. Probably work on the mother-of-pearl inlay some and maybe even go back to the stool again (I’ve got the brushes for it).

I need to be pushing a little harder on this.

Monday, May 30, 2011

Days 88 and 89 – Saturday and Sunday, May 28 and 29 – Looks like a piano!

Goals: Finish with the leather on the hammers and install the keys

Music: Shelley Manne and His Men’s “Complete Live at the Blackhawk” (all four discs).

With the keys inserted back in the piano, it again looks like a piano and the temptation to chop it into a desk or a bar is reduced. As has been the case throughout this project, however, the piano continues to beset me with “good news, bad news” scenarios:

-Good news: I successfully manufactured a replacement hammer from scrap hammers purchased online. Bad news: I wasn’t actually missing a hammer. The space on the hammer assembly is for something else. (Wish I knew what.) At least that explained why I ended up one piece of leather short when I was adding leather to the hammers.


-Good news: I successfully rebuilt the pivot arm end of a broken hammer. Bad news: The difference in shape and size is just enough that the wippen didn’t pick it up and project the hammer correctly. Hard to believe when you look at the photo – we’re talking a fraction of a millimeter difference! (I ended up shimming the whole assembly to make it work; it still joined the ranks of dead keys after the first go around.)
Top is the replacement, bottom is an original. Yeah, they're different, but...

-Good news: I finished putting the leather on all the hammers. Bad news: Even with careful and thorough trimming, the tiny size differential makes many of the keys stick, both against each other and against parts of the piano when the keys are reinserted.
Hammers all covered in leather and ready to go.
The pile of leather chunks that took be two days to trim from the heads - and they still don't work right.

-Good news: I was able to insert the keys and a number of them actually hit on the strings they were supposed to and made a passable sound. Bad news: After playing once through the keyboard, any number of keys went dead, or took some jiggling to get playing again, or didn’t sound at all in the first place.

-Good news: The rough tuning of the piano means I have actually gotten a reasonable facsimile of harmonic sound from the strings. Bad news: Not realizing that some of the “single” bass strings were actually “double” bass strings, I’ve got the piano tuned to play more notes than there are keys.

Good news: At the lower end of the keyboard, all the keys work. Bad news: The ones that are supposed to be hitting double strings are only hitting one string. (Maybe it doesn’t matter if I tune them or not.

Memorial Day will be filled with tuning work and key adjustment. I’m even going to have to get my piano repair manual out and see what my options are with the wippens that aren’t triggering the keys right after I just fixed them. (I mean, of course I made sure all the keys were working before I reinserted them, but I didn’t think so many would go dead right out of the gate!)

One more: Good news: The soft pedal actually moves the damper assembly into position and deadens the hammer strike on the strings. Bad news: It doesn’t go back on its own. More adjustment! 

Monday, May 23, 2011

Days 86 and 87 – Saturday and Sunday, May 21 and 22 – Devil in the Details

Goals: Put the leather on the hammers, install the keyboard assembly after checking that everything works

Music: Humphrey Lyttelton’s “The Parlophones” (all four discs); Bud Powell’s “The Amazing Bud Powell, Volume Three”; Buddy Rich’s “The Best of Buddy Rich”; Max Roach’s “Freedom Now Suite”.

Delicate, boring work. Boring and delicate. That’s all that separates me from a completely refurbished antique square grand piano: boredom and delicacy.

All I did on Saturday was cut the leather strips for the hammers and glue them to the hammerheads. That’s “all”. As I recounted in my last entry, I did not want to do this in stages because I was afraid of mixing the lengths. And, because I was using contact cement, I wanted them to be done all in one fell swoop. I was a little non-committal about whether I should put glue on the entire head and strip or just glue the ends with the body of the strip stretched over the hammerhead. I opted to leave the middle glue-less to give me some land to handle the strips with. This turned out to be a fortuitous decision, as I will relate in a moment.

One I got to cutting and placing the strips, I noticed they were all just about the right width, but most of them were too long (not sure why). Some I cut, some I used the extra surface for stronger adhesion. This, too, turned out to be fortuitous. Anyway, it took about four hours, but I managed to glue all the strips to the hammerheads.

On Sunday, I reviewed my work and naturally, all the strips were jamming into each other, causing all the keys to stick, pull multiple hammers, and not return to the down position properly. I expected this, and was sure they’d have to be cut. Here’s where not gluing the entire strip to the hammerhead paid off: I could trim the leather strip without having to trim a fat portion of the felt head. Nearly all them went smoothly. Some I could get just with the small pointy cosmetic scissors, but the majority required being held with tweezers while cutting with a razor. Due to placement issues, some I ended up cutting close to only about an eighth of their original width. That’s where the extra land for adhesion came in handy (for those strips that had it). Unfortunately, with my poor eyesight and inexperience, some of the strips I cut right through, releasing one end of the hammer. I used super glue to reattach these, not wanting to fuss with the contact cement any further. At the end of the session on Sunday, I was about twenty keys from the end, but that’s actually much closer to the end of this stage, because the high keys, which sit almost directly perpendicular to the strings and parallel to each other will not need any trimming. (Hooray!)

I have at least two wippens that will need adjusting before I can install the keys. Then, the sound of hammer hitting string and generating music will again emanate from my piano, almost one year to the day since the last note was heard from it.

I bought some clear acrylic resin that I’m planning to use to fix up the mother of pearl inlaid board. If I can get that to look pretty decent and the piano to play, I will have 99% succeeded in the refurbishing of this piano.

Tuesday, May 17, 2011

Days 84 and 85 – Saturday and Sunday, May 14 and 15 – Andddd...........next!

Goals: Finish the piano

Music: Gerry Mulligan’s “Original Quartet with Chet Baker” (both discs); Bennie Moten’s “Band Box Shuffle” (both discs); Paul Motian’s “The Sound of Love”, Fats Navarro and Tadd Dameron’s “Complete Blue Note Recordings” (both discs).

With jazz improvisation class finally over, I have nothing but time for working on the piano. And after my trip to Memphis where I saw Francis Scott Key’s square grand piano and the non-functional shape it was in, I’ve been feeling a little inspired to get my piano back into operation. So I set to work.

Needless to say, there’s nothing left but a lot of little jobs, most everything cosmetic. I just take each job as I think of it and in whatever order necessary to complete the work properly. I obviously needed to get the key and hammer assembly back in, which meant repairing the one broken hammer and fabricating the missing one. Using spare parts that I bought on e-bay, I started with repairing the one broken hammer. It just needed a new pivot head (I’m calling it – I don’t know what it’s called). Not knowing how much of the shank goes into the pivot head, I decided to split the old one to see for sure. Here’s what that looked like: 
Bottom shows pivot head in mount assembly. Those pieces are the old pivot head. Uppermost is the original hammer and shank.

After that, it was an easy enough job to remove one of the old pivot heads from the spare parts, drill and scrape out the old shank bits, and sand and shorten the actual shank to fit into the hole. Wood glue and a little eyeball measuring next to the other hammers, and it was ready to install:
Repaired hammer ready for installation.

Manufacturing the replacement hammer for the one that was missing was a bit trickier and time consuming. Because the hammer has to fit between a bunch of other hammers, it needed to be sized correctly, but all of the parts I got off the internet were for the larger hammers at the other end of keyboard. I thought about sliding all of the hammers down one, but I was worried doing so might create fit issues down the line, especially with the felt pads that catch on the wippens. I didn’t want to deal with that , so I decided to see if it was possible to use my Dremel tool to whittle down the size of the felt on one of the big replacement part hammers to make a small felt head hammer. 
What I started with (left), and what I hoped to finish with, approximately (right)

I found that it was an easy enough process with the only drawback being that it generated a lot of dust, and so I set to manufacturing a replacement hammer, doing most of the felt trimming outside. That was a two day process due to the amount of sanding needed and also having to glue the felt, using contact cement to hold it and super glue to harden it. When all was said and done, I had my replacement hammer:
Left: What I started with; Middle: What I ended with; Right: What I was trying to get to

It fit adequately in the spot that had been missing a hammer for almost forever. (I could tell by the wear on the felt underneath the hammer housings.)
Here you can see how light the felt is where I removed the hammer, but how dark where the missing hammer was. That hammer was missing for a long time, telling me this piano has probably been unplayable - and unplayed - for 50 or more years.

I reattached the wippen stoppers and hammer assembly to the keyboard frame, holding the wippens in place with string when I fitted the hammers back in place. Upon releasing the string, I found all the keys and hammers in working order. (Thank God!) I wanted to slide the keys in to see and hear them hit the strings and hear what it sounded like, but I still had to put some leather over the worn surface of the hammers. What’s next is next, so I set to it.

I marked up the thicker portion of the lamb leather that I will be using to cover the hammer heads with, having measured and calculated that some time ago. 

The leather, ready to be cut (pencil for scale)
I didn’t start cutting up the individual strips, though, because I’m going to cut and glue and cut and glue those individually so that I don’t have to mark them up or anything. I’m not really sure which would be more tedious, cutting all then gluing, or cutting and then gluing as I go, and although I think splitting the jobs would be faster, cutting and gluing in tandem should be easier and make it easier to avoid mistakes.

So, without having enough time to tackle the leather gluing job, including the fact that the outside temperature was too low to open the windows, I moved to some other minor finishing jobs. So finally, I cut a few pieces of felt and threaded them through the strings, working from photos of the original state of the piano (always an inspiration).

I still haven’t figured out what I’m going to do about the missing damper arm. Hopefully I’ll get lucky one of these days and come across some damper arms on the internet. Until then, I’m going to have one low, long-ringing F note.

When I finish the piano, that is.

Wednesday, May 4, 2011

No piano and no piano

I find myself all of a sudden briskly stomping through the month of May, no closer on the completion of my antique piano refurbishing project due to having spent the last three weeks mastering my transcribed solo and three songs that I’m not very good at playing, along with a host of melodic minor scales and modes, all for jazz improv class. And this is not to make light of what is a devastatingly serious topic, but the tornadoes that ripped through Alabama last week left us without power for four days, which not only made it impossible for me to practice (digital piano only), but ended up wiping out my last two classes in any event. It left me with a piano not yet refurbished and some performance ready pieces that have gone as stale as the ground meat in our freezer prior to power being restored. No piano, and, no piano.

At least with class over, I can get back to devoting some time to the refurbishing job, and would have over the weekend if it wasn’t so dark in the house. If I can finish it this month, it will get done in one year, start to finish.

And, not to overemphasize the point, but if you’ve never seen the destructive force of a tornado up close, either during the storm or after, count yourself lucky and offer a prayer to your deity of choice that you never do. The raw power of nature is as terrifying as it is humbling and is better marveled at from a distance. Trust me on this one.

Monday, March 28, 2011

Days 82 and 83 – Saturday and Sunday, March 26 and 27 – Strings are strung

Goals: Finish the strings

Music: Tony Bennett’s “MTV Unplugged”; Lars Gullin’s “Danny’s Dream".

I decided it was high time I quit making excuses and started making some progress on the piano. I was helped by the fact that I largely didn’t feel like practicing the piano this weekend (as much as I do need that). So on Saturday, I completed the rough tuning of the piano, tuning everything down a half tone, so middle A on the piano sounds like G#. My tuner is actually pretty handy, but as I got higher into the upper register, it became less and less reliable. By the time I reached the last few notes, I was tuning by ear alone, but as I got the tones to where I thought I was close, I was able to use the tuner to check them and they all were fine. At the lower end of the double strings, there were about a half dozen pins that needed shimming, including one that I had used a sandpaper shim on. Although I’ve gotten quite skilled at that, it took a little more time than I would have liked, due to having to replace two strings, one that was too short to begin with and one that was kind of short and broke off at the end. Again, due to having gained some skill and plenty of practice in this area, it didn’t take me long to do.

On Sunday, there was nothing left but the 33 wound bass strings, all singles. Not being in the mood to fuss and knowing that when I did the reaming I started at this end and wasn’t tired so the holes were probably all over-reamed, I went straight to the oversized pins. Even at that, I had to shim quite a few, say one of every three, so towards the end, I just went with putting a shim in automatically without bothering to check fit.

Because all these strings were custom made, I took my time handling the actual strings. I made sure every one had plenty of wire to wind on the pins, I started the pins up high to allow me to wind them well, and I made sure every one was seated properly before winding. I only had one or two give me fits, mostly towards the end when my eyes were getting tired and I couldn’t tell if the coils were seating correctly or not. But in about three hours, I had completely attached and tuned the 33 single bass string strings. The strings are now complete: 

The big advantage of finishing this part of the project is it allows me to clean up a good bit. I can put away all the boxes of pins (3 of them), the sandpaper and metal shims, the aluminum bushings (never used) the coils of wire, plus all the tools that go with this part of the project – hammer, pin driver, pin turner, tin snips, stamp tongs (for inserting shims), calipers (for measuring strings and pins), and tuning wrench and tuner (which I’ll need again later). I can now also throw out all the old strings and put into storage my string size chart, marking flags and all the miscellaneous stuff that accumulated during this phase of the project. I’m sure I won’t know what to do with all the space.

Next up is the hammer assembly and the damper arms. I still don’t know what I’m going to do about the missing damper arm, but as I do have replacement hammers for the broken and missing ones, I guess that’s where I’ll start. Although I have a lot of little jobs left, I’m thinking I’ll be able to steamroll through them. I very well may be catching my second wind for the fourth or fifth time.